Quick Start Guide
Set up your GCP 2.0 device in minutes
Follow these steps to connect power, register your device, and confirm data collection on the network.
Before you begin
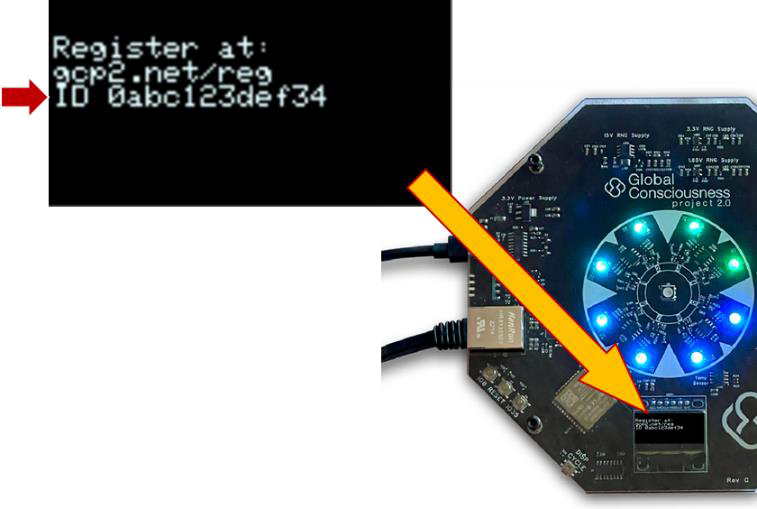
Have your Device ID visible on the screen and keep the supplied Ethernet cable and power adapter nearby.
Setup
Connect, power, and register
Use the steps below to bring your RNG online and link it to your account.
- Step 1
Connect to your router
Use the supplied Ethernet cable to connect your device to a router, modem, or switch.
- Step 2
Power on the device
Connect the provided power supply to the USB-C port on the device, then plug it into a wall outlet.
- Step 3
Register and activate
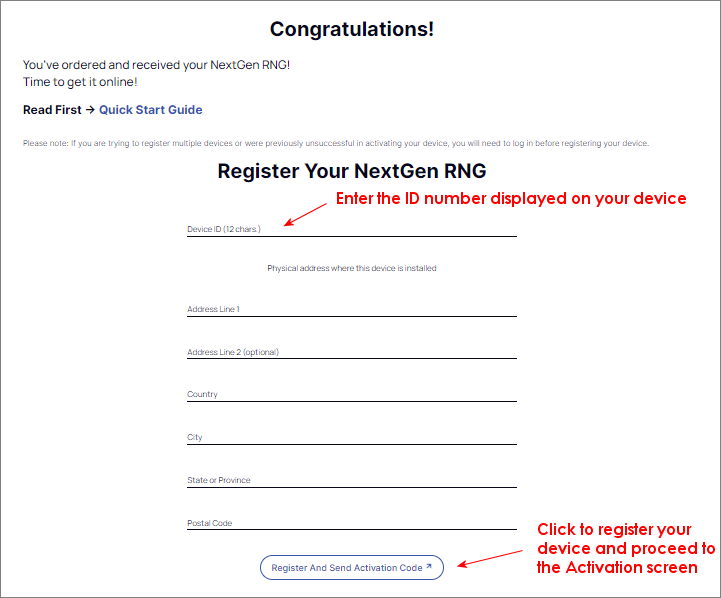
Open the registration portal and follow the prompts to register your device and receive its activation code.
Open registration portal- Enter the case-sensitive Device ID shown on the device screen and complete the registration form, including the installation address.
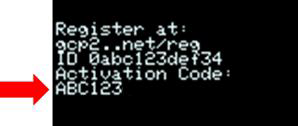
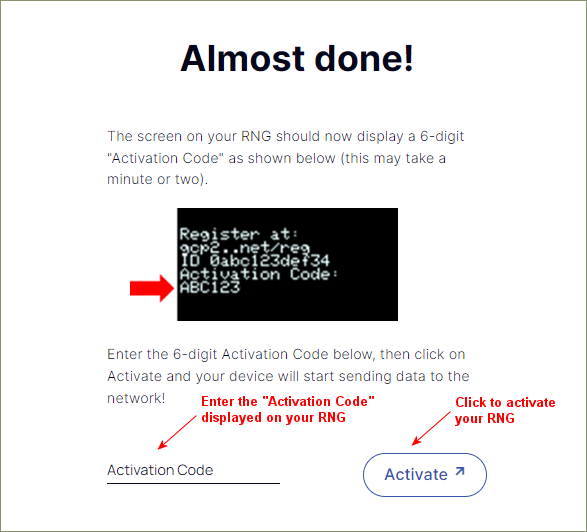
- Enter the 6-digit Activation Code displayed on the device screen, then select Activate to finish.
Display sleeping?
If the screen goes dark, press the DISP CYCLE button to the left of the display to wake it.
Registration flow
What you will see online
These screens walk you through entering your Device ID, confirming the activation code, and finishing setup.

Status check
Look for Collecting Data
After about seven minutes, the device should display "Collecting Data," confirming it is online and sending data to the GCP 2.0 network.

Placement
Choose a stable location
Your RNG performs best when temperature changes are minimal and the device is undisturbed.
Avoid windows, vents, or direct sunlight that can cause rapid temperature swings.
Keep the device away from large appliances such as air conditioners or microwave ovens.
Pick a quiet corner where the device can remain plugged in and undisturbed.
Check occasionally for red attention LEDs to ensure it remains in good standing.
Appendix
Hardware reference
Quick reference for the physical connections and controls on the device.
Ethernet port
Connects to your modem, router, or network switch.
Power port (USB-C)
Connects to the provided CanaKit 3.5A power supply only.
DISP CYCLE button
Toggles between the Status screen and the Hardware Information screen.